
Recently, when revisiting tutorials on building a Dropshipping store on Shopify on my YouTube channel, as well as reviewing and contributing edits to followers’ stores, I realized something: Many stores need a lot of work. They are almost all at a point where they need to be redesigned for completeness.
Believe me, on Dropship Lifestyle, I receive countless questions from hesitant individuals stuck at the web design stage. They mostly go like this, “Hey, Anton, I want to enroll in your courses, I want to learn how to use your business system, but I don’t know anything about web design. How difficult is Shopify?”
Actually, creating a visually appealing Dropshipping store is not as complicated as you think. And it doesn’t have to be the most beautiful store in the world to bring you a seven-figure revenue. All you need is a Dropshipping store on Shopify that attracts visitors, and they feel confident enough to make a purchase.
Building a Dropshipping store on Shopify in 10 simple steps
Whether you’re 17 or 71, building an e-commerce store and dealing with “techy” stuff can make anyone feel overwhelmed and “scary.”
For the purpose of guiding you through building a store on Shopify, I’ll use the example of Happy Paws, one of our current demo stores on Drop Ship Lifestyle. By the way, I’m not encouraging you to “steal” ideas from other people’s websites!
From guiding you through setting up your store to using Shopify apps and customizing themes, this article will turn you from a novice into a Shopify pro in just 10 simple steps!
- Step 1: Sign up for Shopify
- Step 2: Choose and download a theme within Shopify
- Step 3: Register a domain name
- Step 4: Create product collections
- Step 5: Upload products to Shopify
- Step 6: Add pages and posts
- Step 7: Create a menu within Shopify
- Step 8: Customize the theme within Shopify
- Step 9: Install Shopify
- Step 10: Install Shopify apps
Are you ready to build your Dropshipping store?
Step 1: Sign up for Shopify
It all starts with the first step: you need to sign up for Shopify.
By far, Shopify has been my favorite e-commerce platform. Since 2013, it’s been the only Dropshipping platform we use or recommend to others.
To sign up for Shopify, you visit this link. Shopify allows you to try it out for 14 days, during which you won’t be required to enter a credit card or anything like that.
When entering your email, you’ll be prompted to set a password and name for your store (you can change these later). After submitting them, you’ll see a few forms pop up, just fill those out. Once completed, Shopify will do its part and load the default settings for your new store.
Visit Techvui Shop: https://techvui.com/shop
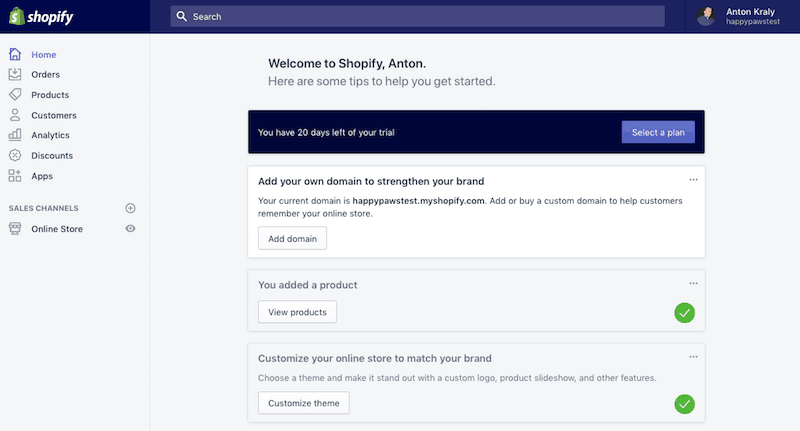
Next, you’ll be taken to the Dashboard, where you can access both the back-end and front-end of your Shopify store.
TIP: Back-end, or server-side, in simple terms, is how a website operates, updates, and changes. The back-end deals with things users can’t see, like databases and servers. Front-end is what users can see, including design and languages like HTML and CSS.
Source: dropshiplifestyle
The Shopify Dashboard will help you manage all aspects of your business, where you can:
- Build your website (and preview what customers see)
- Accept payments from customers
- Manage shipping options
- Adjust discounts
Now that you’ve officially signed up for Shopify, it’s time to move on to step two. I’ll guide you on how to choose, download, and use a theme within Shopify.
Step 2: Choose and download a theme within Shopify
A theme is like a design blueprint or template for your Shopify store. You need a theme to provide the framework for your store and then customize it accordingly. You can use images, rearrange layouts, choose fonts, and colors to suit your brand.
On the left side of the Dashboard, you’ll find “Online Store” under the “Sales Channels” section. Click on it, and in the dropdown menu, select Themes.
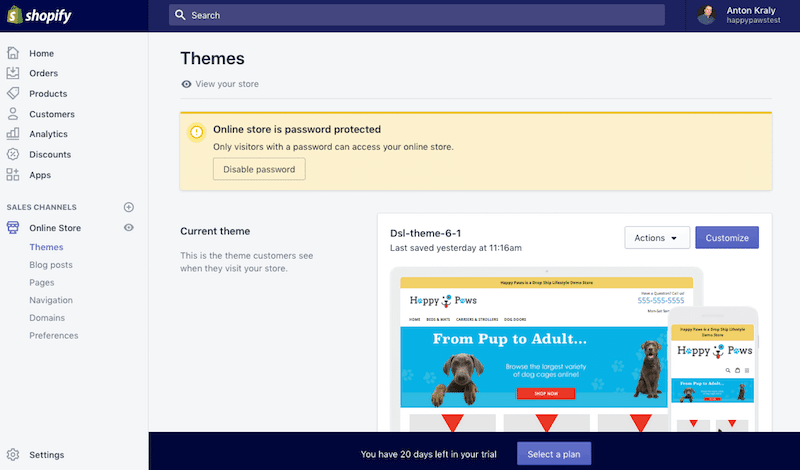
Choose and download a theme within Shopify. Source: dropshiplifestyle
By default, Shopify will provide you with an initial theme called “Debut.” You can use it if you’d like. Otherwise, I’ll show you how to choose a new theme at the end of this guide.
Once you’re in the Themes section of the dashboard, you can scroll down and explore Free Themes or browse through the Shopify Theme Store.
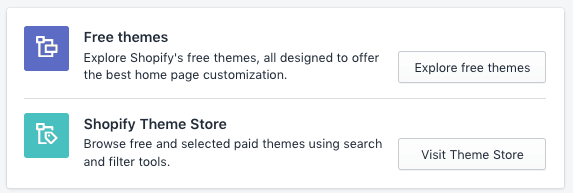
explore Free Themes or browse through the Shopify Theme Store.
In fact, I’ve attended Shopify developer conferences and was pleasantly surprised to learn about the many talented individuals who have worked hard to design Dropshipping themes on Shopify.
After browsing through the themes, you’ll notice some are free, while others are paid. It’s not uncommon to pay over $100 for a handy Shopify theme that exceeds expectations.
If you scroll through and find a theme you like, check if it’s a paid theme. If so, you can select it through the store.
You can preview a demo. If you decide to purchase it, it will be added to your Dashboard. Now, select the template, and BAM! Your store’s design will change before your eyes.
In this guide, I’ll use the DSL Theme, v6.1, to show you how to build a Dropshipping store.
TIP: If you’re a member of Drop Ship Lifestyle, head to the member’s area to get this theme. You can find the download link as follows: Members Area -> Drop Ship Blueprint course -> Module 3.1
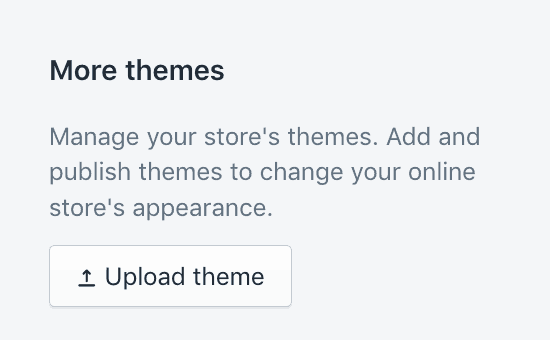
Upload Theme. Source: dropshiplifestyle
For any Shopify theme you download, including our DSL theme, you’ll first need to upload it to your store as follows: scroll down to Current Theme -> select the Upload button -> Module 3.1
Another important note to remember: Your theme won’t be public until you select “Publish.”
Although the theme has been uploaded to your Shopify account, it needs to be adjusted. I’ll guide you through this in the following sections.
Step 3: Register a domain
After creating and installing a theme for Shopify, you now have a basic store. And now it’s time to choose a domain name for it.
In this guide, I’ll keep the name that Shopify provides (the name I originally registered). But for your own store, you may want to register a different domain BEFORE continuing to build your Dropshipping store on Shopify.
TIP: The default Shopify store domain name will be in the format: StoreName.myshopify.com. Initially, it looks okay, but as your store becomes operational, you’ll probably want to remove the “myshopify” part.
On the left column under “Online Store,” click on “Domains.” From there, you’ll see two options:
- Purchase a new domain through Shopify ($14/year), or,
- Purchase a domain from a third-party provider.
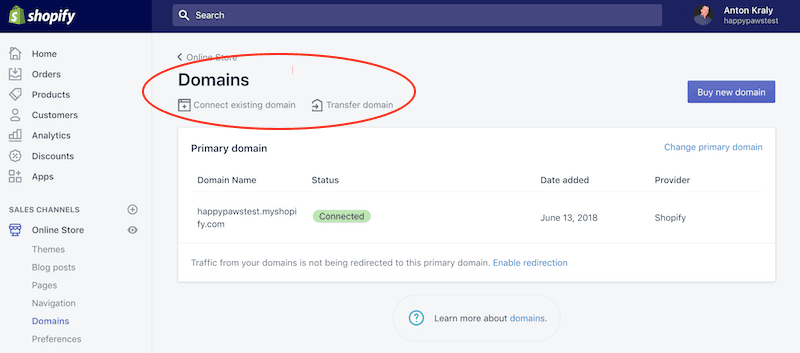
Buy domains. Source: dropshiplifestyle
According to me, if you’re opening a Dropshipping store on Shopify, you should buy a domain through Shopify. $14 is not only a bargain compared to other options but also the easiest choice for you.
After registering your domain name, you’ll move on to creating product collections.
Step 4: Create product collections
Create collections in the form of Categories. In a dropshipping store, it’s beneficial to group products into collections to make it easier for customers to navigate.
For example, in our demo dropshipping store, Happy Paws, products for dogs are grouped into collections as follows:
- Crates and Kennels
- Dog Doors
- Gates and Fences
- Carriers and Strollers
- Beds and Mats
- Best Sellers
- Staff Picks
- On Sale Now
To create categories for your Dropshipping store on Shopify, follow these steps: Dashboard -> Products -> Collections. Click on the purple button on the right side of the screen “Create Collection.”
Create Collection. Source: dropshiplifestyle
It will bring up a page with all the necessary settings for you to create a collection. After naming your collection and adding products (choose Manual to add manually or Automated to add automatically), save it.
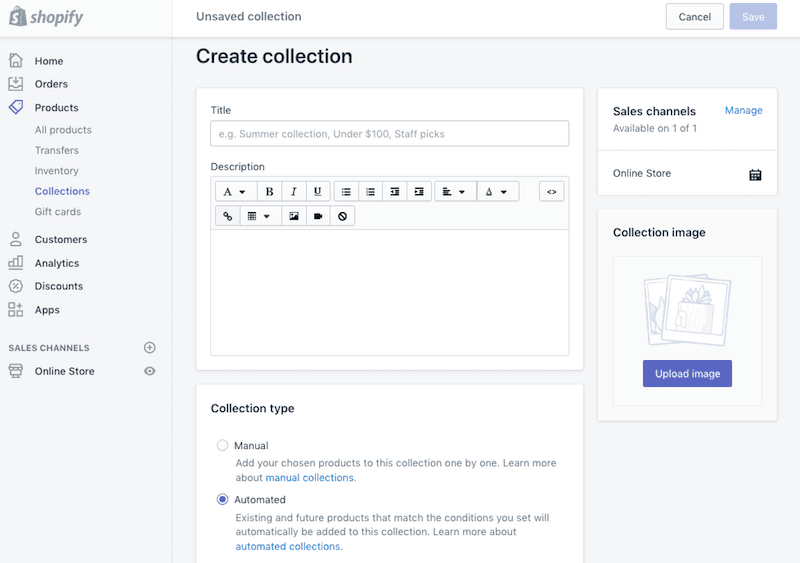
Don’t forget to set a “Collection Image” to highlight your collection. This image will be displayed in the theme, which I’ll explain more in the following section.
One thing you need to set up in your collection is product filters. This is a way to help customers filter products by price. Creating product filters is also straightforward.
For example, to create a new collection with the name “Under 100$”, customize the “Collection Type” settings as follows:

Keep doing this and save it. You can continue setting up new collections, adding more conditions to filter even more products by price.

These automatic collections are quite simple and time-saving. Besides automatically filtering by price, you can set up other automatic filters by brand, tag, discount, etc.
Furthermore, you don’t need to repeat this process for each product. Just set the conditions upfront, and the system will automatically filter every time you upload new products.
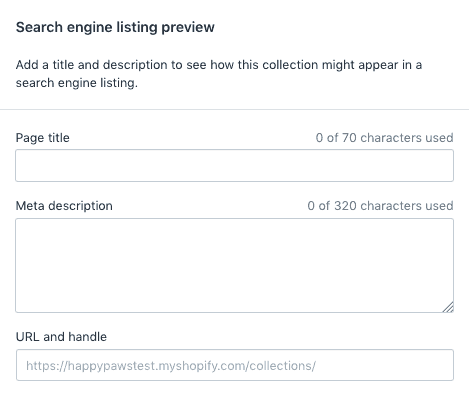
Filling in the “Search Engine Listing Preview” settings for the collection is also essential for your Dropshipping store on Shopify.
Actually, you can do SEO for your store later, when it’s reached the “looks good, utilities full” level. For now, we’ve just helped you create a visually appealing store with full functionality.
Now that you’ve finished setting up your collections, what are you waiting for? Upload your dropshipping products!
Step 5: Upload products to Shopify
If you’re reading this guide and already have suppliers and CSV sheets, you can import them as shown in the image:
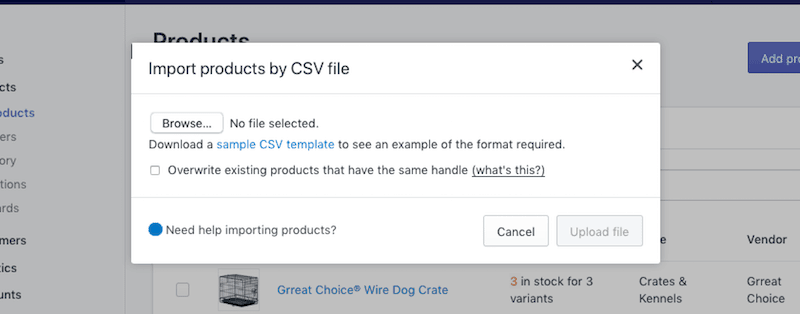
Import file CSV. Source: dropshiplifestyle
However, if you don’t have suppliers yet, you’ll need to add some demo products to your store.
Three essential pieces of information for each product:
- Product Name
- Product Description
- Supplier (Brand)
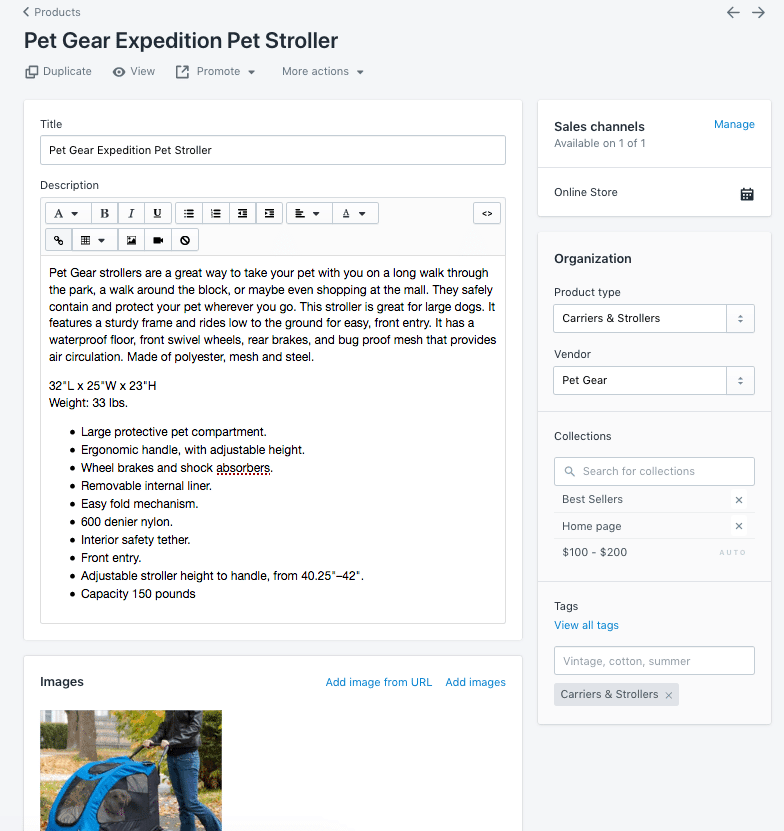
Information needed for the product. Source: dropshiplifestyle
Since you’ve already created your collections, you can choose the Product Type for your products right away. If necessary, you can add them to other categories in the section below.
You can tag the products any way you like in “Tags,” but it’s not necessary if they’re demo products.
Next, upload one or more images to showcase the product’s appearance to customers.
Once everything is set up, you should preview how the product page will look. At the top, under the product title, click “View” to see your overall page.
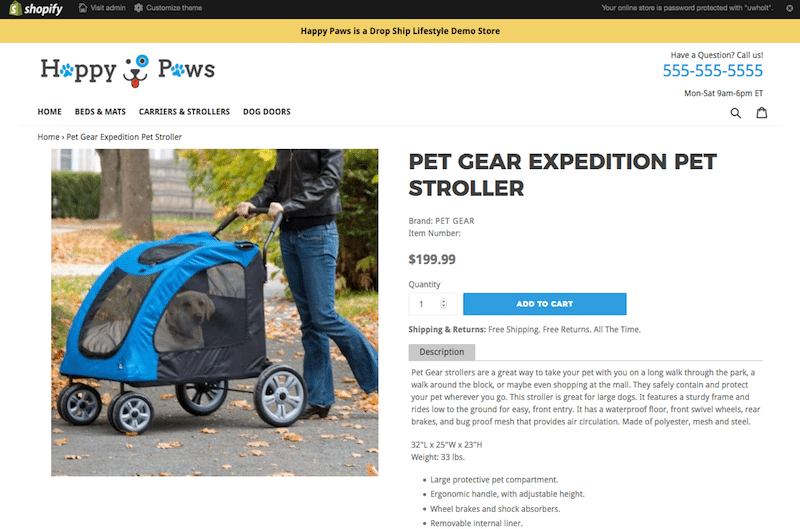
Overall page preview. Source: dropshiplifestyle
It’s undeniable that uploading new products is one of the most tedious and time-consuming tasks in the world, especially in the beginning. I’ve guided you through the basic steps to add products to your dropshipping store.
Step 6: Add Pages and Posts
The next step in building a dropshipping store on Shopify is to add pages and posts. On our original demo store, you’ll notice some “Quick Links” in the footer.

Quick links. Source: dropshiplifestyle
These “Quick Links” lead to pages such as About Us, Price Guarantee, Shipping and Returns, Contact Us, and others.
We consider these types of webpages as “Pages” (different from “Product Pages”).
It’s important to note that posts are different from pages. Posts are essentially blog posts. On the homepage of our demo website, you’ll see three blog posts near the bottom of the page.
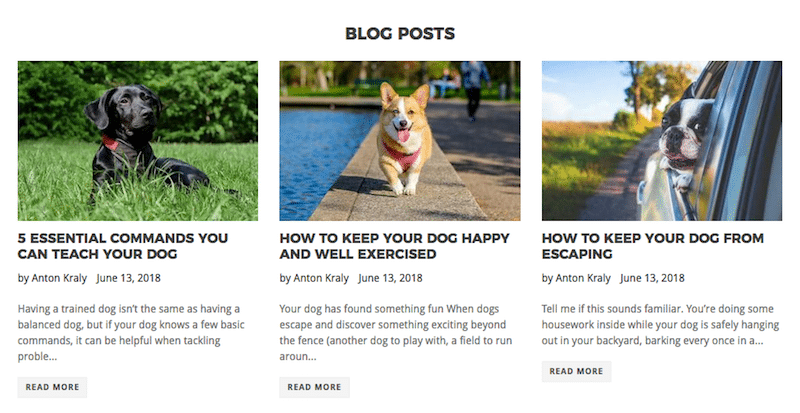
Posts vs. Pages. Source: dropshiplifestyle
Adding pages to your Shopify store is quite simple.
From the Dashboard, click on “Online Store” -> select “Pages”. This is where you add and edit pages in your store. To add a page, click the purple “Add Page” button in the top right corner.
You should start with the easiest page: About Us. This page will let readers know about your business. Here’s an illustrative image from our demo store:
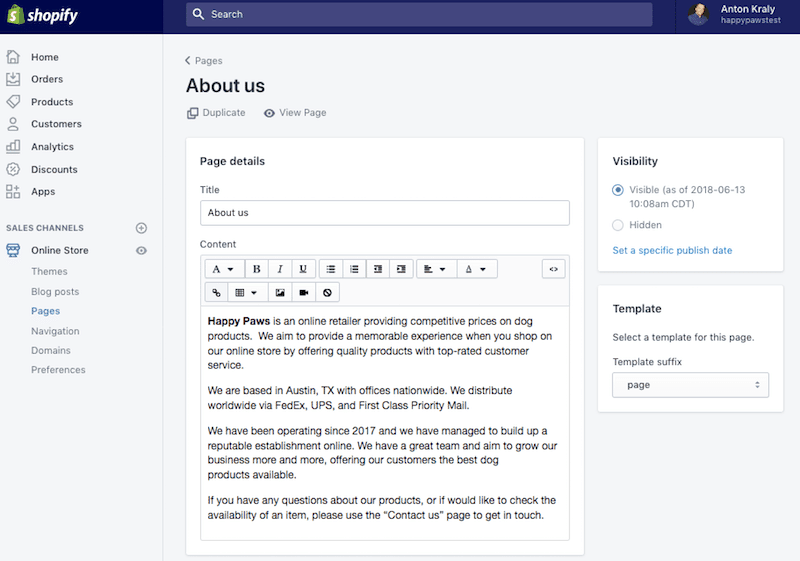
Create About us. Source: dropshiplifestyle
To be honest with everyone, for many years I didn’t build any stores myself. We have an experienced web designer at home: my younger sister. She builds and designs websites for our members.
The best thing about the 14-day trial is that you can play around with different themes, try out different content, and learn easily.
How to create blog posts for your Shopify store
Now that you know what Pages are and which ones you need to create, let’s move on to blog posts.
Shopify wants you to name your blog. On the demo store, we called our blog “News.” Initially, this confused people. So it’s best to name your blog “Blog.” Shopify also allows you to create multiple blogs on your store.
Go to the blog editor. To create or edit blog posts, select Dashboard -> Online Store -> Blog Posts.
To edit a blog post, click on the blue link. To add a new blog post, click the purple button in the top right corner “Add Blog Post”.
Inside the Editor, you can create your blog posts, add text, images, videos, etc.
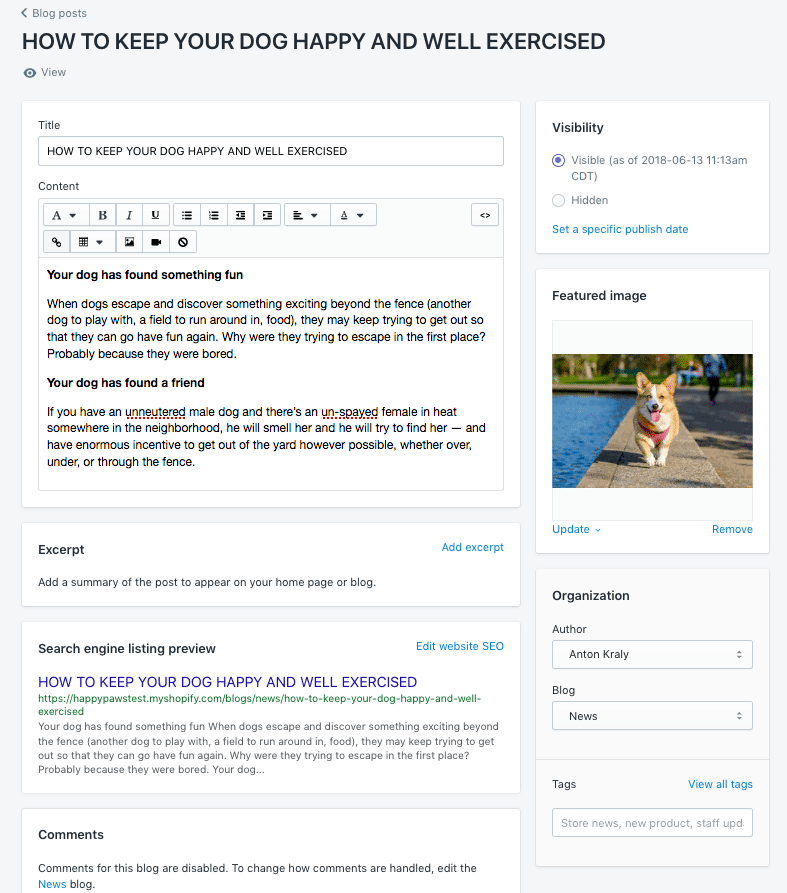
Blog editor. Source: dropshiplifestyle
Before publishing, here are some other editing options:
- Featured Image: This is the thumbnail image representing the post, the face of the article. You can use the main image or free image sources like Unsplash.
- Excerpt: A summary of the post that appears on your homepage or blog.
- Search Engine Listing Preview: This is where you run SEO for the post, including edits for Page Title, Meta Description, and URL.
Now, let’s move on to step 7, creating a Menu.
After adding products, grouping them into collections, pages, or posts, you need to organize them on your online store so that customers can easily find them. This is where you need to create a menu.
When setting up a dropshipping store on Shopify, it’s important to remember how customers want to discover products and business information. This will help them make better purchasing decisions.
Menus are essentially like blueprints that shape everything. You select pages, products, collections, or anything else you want to link and organize them into menus. Then, you can place these menus in different locations on your website.
To find menus, go to Online Store on the Dashboard, then select Navigation.
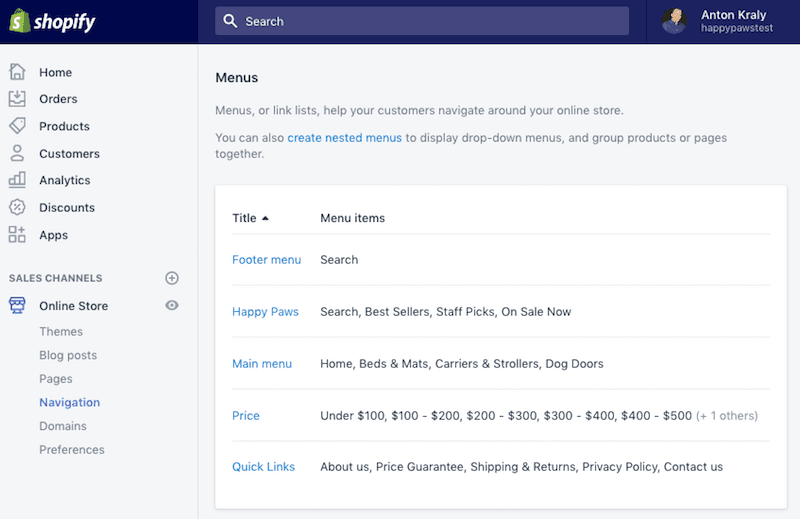
Menu in Shopify. Source: dropshiplifestyle
As shown in the image above, I’ve rearranged everything we’ve done in the previous steps. Product collections in Step 4, “Quick links” in Step 6, and even automated price range categories that we set up from the beginning. Now, have you seen how quickly we’ve created a Shopify store?
Creating all of these menus is the workload I mentioned at the beginning. Some tasks I don’t like to do myself because they’re repetitive. Besides, there are many people out there, like my web designer for example, who set up Shopify stores faster and better than I do. I pay them to do their professional work, and that’s how I make my life easier.
If you’re starting out with basic knowledge to create a dropshipping store and don’t have money for this, don’t worry. Put your heart into the work and learn how to use Shopify, it will benefit you. And of course, there are plenty of free support and resources for you to learn what you need.
Even though we’ve done all the work, uploaded demo products, created collections, and written blog posts, the store still looks quite generic. This will change in the next step.
Step 8: Customize Theme in Shopify
Customizing the theme is the most significant step in building a Shopify store. This is where you make your store look more appealing and user-friendly for visitors when they browse your website.
Before I guide you through customizing the theme in Shopify, you should know that there are differences between each theme. This means that each theme will have different customization options.
In this guide, I’ve chosen DSL Theme V6.1 as an example. Mainly because of its speed and partly because it has everything you need for a high-converting dropshipping store.
To get started, go to the Dashboard and select Online Store -> Themes -> Customize.
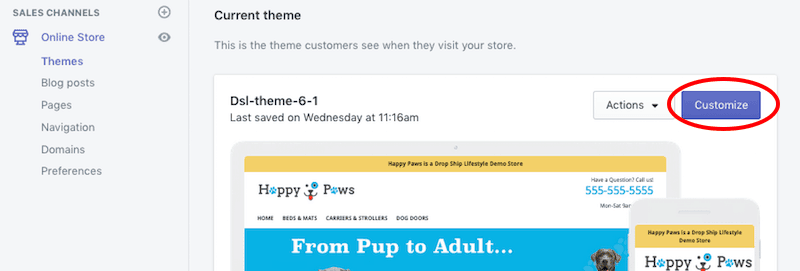
Customize Theme in Shopify. Source: dropshiplifestyle
You’ll be taken to the Theme Editor. This is where you can customize the content, layout, fonts, and colors for your Shopify store. The page has a Preview function, so you can preview any changes before publishing.
TIP: By default, the homepage will be at the top. To edit and set up other pages, select the page you want to edit from the dropdown menu. The two tabs on the left are “Sections” and “Theme Settings”. Select “Sections” to adjust the content and layout for pages in the store. Select “Settings” to adjust fonts, colors, and social media links.

Sections. Source: dropshiplifestyle
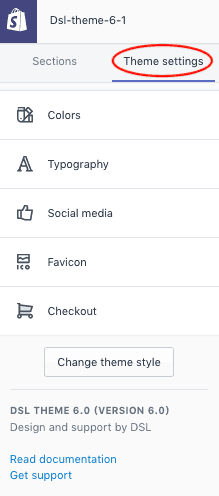
Theme settings
Customizing Sections:
First, let’s talk about customizing “Sections”.
Customizing the Header in Shopify:
We’ll start with the top section, the “Header”. When you click on it, it will prompt you to upload a logo.
If you’re building a new dropshipping store, you’ll need a logo representing your brand.
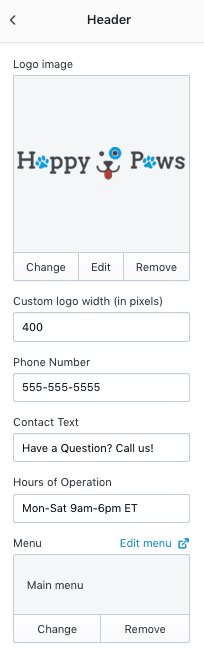
Header. Source: dropshiplifestyle
To find a perfect logo, you can use 99Designs, Fiverr, ask friends, or create one yourself.
There are many ways to get a beautiful logo. Even Shopify has a free logo maker app.
You’ll see options to set up the menu in your Header. They’re like the menus we created in step 7.
You can change, delete, and even edit menus from the Theme Editor. Hopefully, you’ve started to see how easy setting up a Shopify store can be!
One of the final header settings is the “Announcement Bar”. The announcement bar is an extended header on the page to let viewers know about important news and deals. It’s an eye-catching way to attract viewers. You can customize the color to match your store’s branding. The announcement bar looks like this:
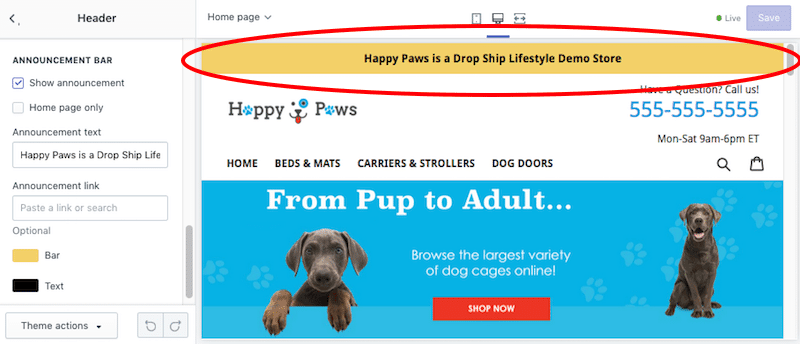
Announcement Bar. Source: dropshiplifestyle
TIP: Don’t forget to save your changes after a few minutes, if you forget, the “technology risk” will flush your efforts down the drain. To add Sections to the page, it’s very simple, just click the purple “Add Section” button, a long list of options will appear. Here are some sections you might want to add to the homepage.
Creating Slideshows in Shopify:
Displaying images and new collections through slideshows will be very eye-catching for viewers. Shopify helps you easily upload and adjust the images you want to include. There are even options to add text to images (leave it blank if you don’t want to add text), link, and align.
Add text to images. Source: dropshiplifestyle
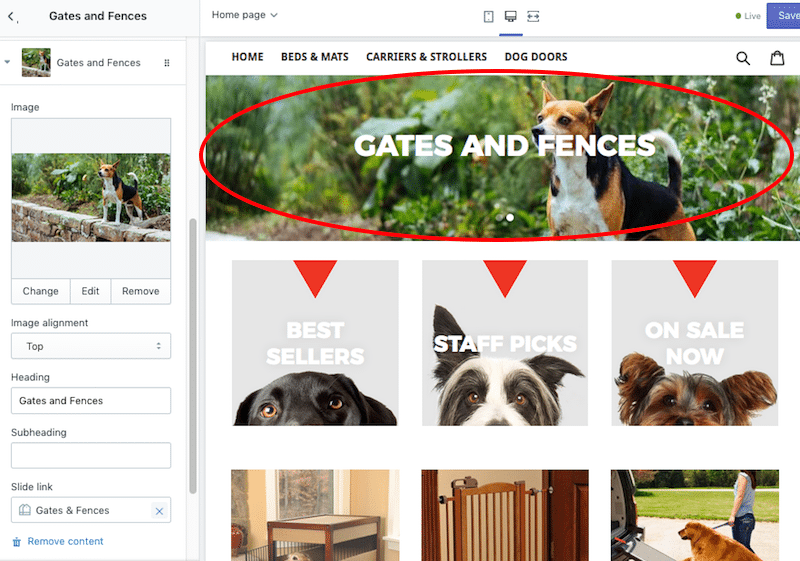
Setting up Collection List in Theme Editor:
In the Collection List setup, you can customize and display your collections. For the demo store, we chose to feature best-selling items, staff picks, and discounted items. You can edit and customize this section to fit your store.
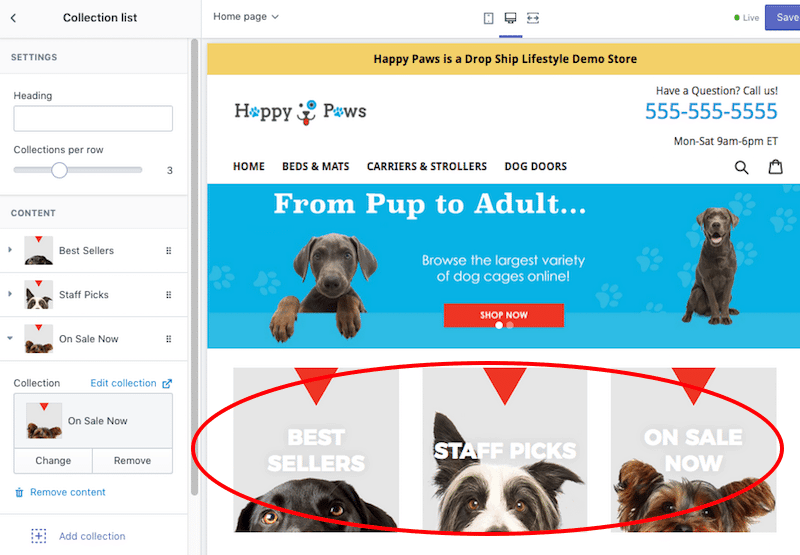
Collection list. Source: dropshiplifestyle
Building Custom Content in Theme Editor:
Depending on the Shopify theme you’re using, you may need to create custom content sections. This part of the Theme Editor allows you to insert any custom HTML.
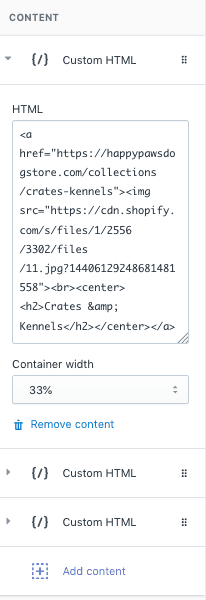
Custom HTML. Source: dropshiplifestyle
This is the part that seems confusing and overwhelming. They’re custom codes, sure, but they’re extremely basic HTML. Don’t get too overwhelmed. I promise you, whether you’re 14 or 80, basic HTML is something you can learn quickly.
Finally, you’ll need to adjust your Footer. This is the business information section found at the bottom of most websites. You’ll have options to add menu, contact information, quick links, social media links, payment options, and more.
In this section, you can add as much detail or as concise as you want. Just remember to keep it simple for viewers to navigate to your Shopify store.

Customize Footer. Source: dropshiplifestyle
Rearranging Theme Sections:
As you continue to add other sections (like “Best Sellers” and other collections), you may want to change their order. Nothing is easier than this, Shopify’s drag-and-drop feature is very easy to use.
To move sections, click and hold the six dots on the right of each section and rearrange them in the order you want.
Customizing Theme Settings in Shopify:
Now that you understand the purpose and tasks of Sections, it’s time to talk about Theme Settings. Remember, you can use Theme settings to make changes to fonts, colors, social media links, and store payment settings.
Theme Styles: These are a set of settings chosen by theme designers, you can apply them to your store to create a professional feel. All themes have a default style, and you can change it in the Theme Settings section of the Theme Editor.
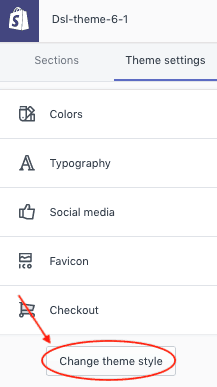
Change Theme Style. Source: dropshiplifestyle
TIP: When customizing the theme, the settings in the theme style will be replaced by your settings. If you apply a certain theme style to your theme, the current settings like colors, print styles will change.
As I mentioned before, with Theme Editor, it’s best to experiment with all settings to find what fits your Theme and store. At first glance, setting up a store in Shopify may seem to require technical expertise, but Shopify has done an excellent job of making everything simpler and faster.
I’m not a designer. And perhaps I’m also among the “tech-illiterate”. But if I can learn to do this and do it quickly, so can you.
Even if you need help building a dropshipping store, Drop Ship Lifestyle will be able to assist you! Whether it’s customizing the store, designing a logo, or learning how to quickly upload products, we have the resources and expertise to help you succeed with dropshipping.
Step 9: Setting up Shopify
One of the crucial steps to completing the setup of a dropshipping store on Shopify is configuring the options for your website. From Dashboard -> Online Store -> Preferences.
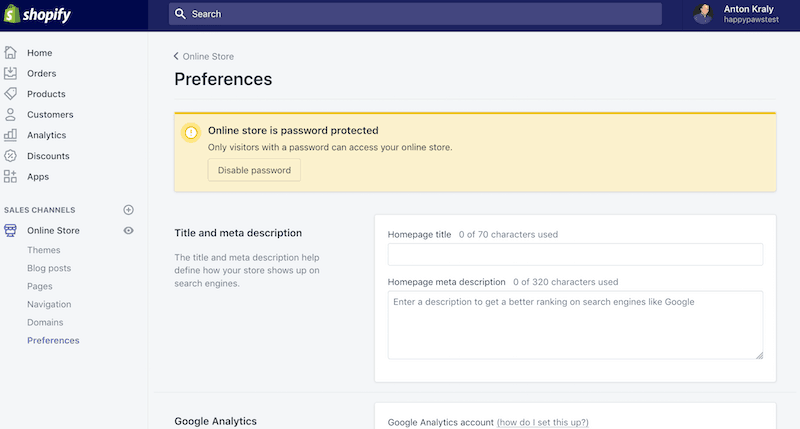
Preferences. Source: dropshiplifestyle
From this section, you can add Google Analytics code to track visitors and see what they’re doing on your Dropshipping store. You can also add Facebook tracking Pixels to retarget customers who didn’t make a purchase. Shipping options, taxes, and payment acceptance are also set up in this section.
The important business details related to your Shopify store will be in the Preferences section.
If you want to remove the password protection from your e-commerce store, you’ll need to sign up for a Shopify plan. There are several different options for Shopify plans, but here I recommend the “Basic Shopify” plan, which costs $29/month.
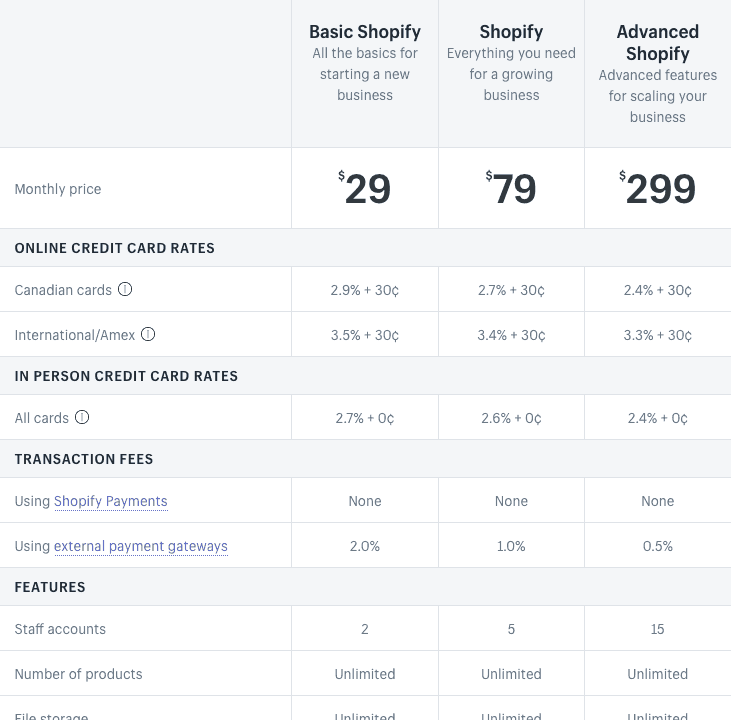
Basic Shopify plan. Source: dropshiplifestyle
The Preferences section of your Shopify Dashboard has all the crucial business details for your Dropshipping website. You’ll need to consider things like whether you’ll charge for shipping and which service you’ll use. As your business becomes clearer, visit this section to add or make changes to these details.
In fact, it’s all straightforward. I’m not saying you won’t have to go around in circles while learning how to create your first store on Shopify. And I’m not saying web design is a skill everyone can master.
What I can say is that Shopify has made the process of building your Dropshipping store simpler and clearer. Once you understand the step-by-step process of building a Shopify store, what you need to do now is follow some of my advice in this post.
There’s one thing you need to do before unveiling your Dropshipping store on Shopify. And here it is: my favorite step…
Step 10: Install Shopify Apps
At this point, your Shopify store is ready to start selling. However, there’s one more step you can’t overlook: installing Shopify apps!
Just like Apple and Android, Shopify has its own app store. Currently, there are over 1,200 different apps in the Shopify App Store. To get started, here’s a list of the top 16 Shopify apps for Dropshipping and e-commerce stores.

Shopify App Store. Source: dropshiplifestyle
With just a few clicks, you can add all sorts of products and services to your Dropshipping page. Shopify has apps (most of them are free!) that can help you with things like:
- Email Collection
- Store Analytics
- Package Tracking
- Order Forwarding
- Discount Codes
- Live Chat
Adding Shopify apps to your Dropshipping store is also easy and straightforward. You can browse the app store from the Dashboard or Shopify’s website. To choose the one you need, click the green “Get” button to install it on your website.
TIP: Before installing any Shopify apps into your e-commerce store, you’ll need to verify that the app is functional and won’t break your website. To ensure the quality of the apps you’re downloading, you can check its ratings. (Ratings are an indication of the popularity of the app!)
Shopify will then redirect you to a page providing more details about the app. When you agree and select “Install,” Shopify will automatically install the app.
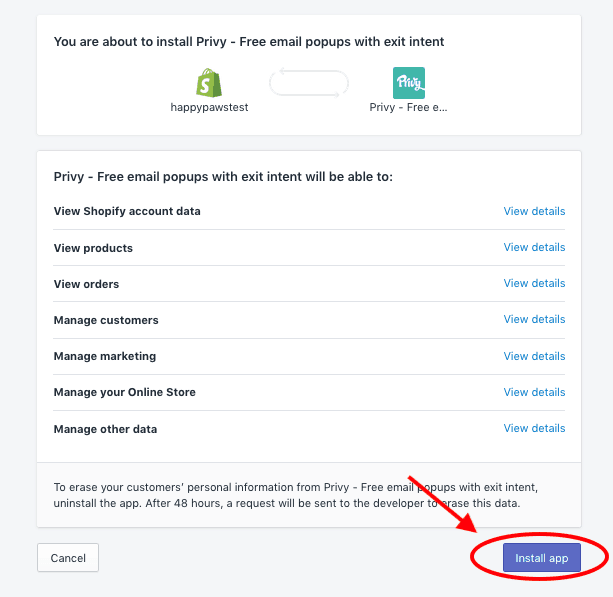
Install App. Source: dropshiplifestyle
Next, you’ll be taken to where you can adjust the app’s settings. Each app will have different settings and usually comes with support or a help forum if you encounter any issues.
Are you ready to build your own Dropshipping store?
To wrap everything up, I want to leave you with this:
DON’T STOP building your Dropshipping store just because of technical requirements! You’ve been guided through it. I know, technical technology can be challenging for many of us… myself included.
But that doesn’t mean you should shut down your Dropshipping store just when you’re starting out. Everything will be okay.
If Dropshipping is something you love, you should stick with it. It’s a low-risk business, not dependent on geographical location, and it can bring real wealth to you.
Technical issues will arise. But there are plenty of free resources we provide to help you build your own store, and there are other guides out there that will surely assist you. Just dedicate more time to learning the basics, and you’ll have a beautiful website in no time.